I have special tips for changing print heads
When replacing printer print heads, the user needs to master the scientific way of replacing the print head and replace it according to the prompt on the front panel.
 After installing the print head, cover the print head cover, and the display screen will display two options, "replace another" and "complete and check". Click "replace another", and the user can choose the next print head according to the actual situation.
If you need to replace more than two (including two) print heads, it is recommended that you number the print heads in advance, and then choose "replace another" according to the prompt on the display screen to install the next print head successively. Do not open more than two head covers at the same time, or the printer may not be able to identify the head.
Generally speaking, the print head in the middle will have a slightly higher amount of ink jet than the print head on both sides. The removed print head can be used in the middle with a lower amount of ink jet next time.
If the printer display indicates that a numbered print head is not replaced successfully, repeat the above steps according to the prompt and check the print head after the print head is reinserted. If the replacement fails after repeated plugging and unplugging, it indicates that there is something wrong with the print head, and a new print head needs to be replaced until the printer prompts that the replacement is successful.
 After completing the whole printing head replacement step, it is necessary to calibrate the printing bar and align the printing head on the machine. Because the whole printing rod may not be on a horizontal line after replacing the new printing head, the output image will be deviated, affecting the printing effect.
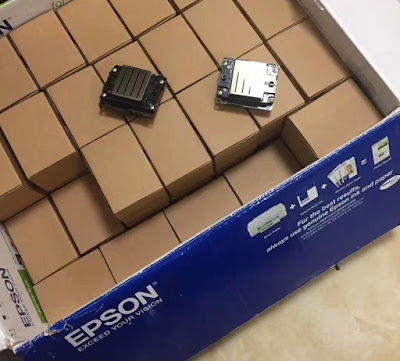
As for the replaced print head, the purple part should be placed face down, and the print head spray hole should be covered with plastic film, cover the cover again, and put into the original package for preservation.
Contact us:
Tel: 86-025-86628894
Whatsapp: +86 18851084450
E-mail: janezhang940213@gmail.com
Website: www.skyimagepaper.com
Company Name: Fei Yue Digital Technology Co.,LTD
Address: Central Road 323, Nanjing, Jiangsu, China
1
First click the "ink" icon on the main screen of the display, and then click the second icon on the left, "print head".2
The interface displays the status of the current eight print heads. Click the "replace" button, and the display will remind you to open the top cover of the printer, and then use gifs to show you how to unplug the print head. (when opening the cover, lift the blue switch on the left and right sides of the cover).3
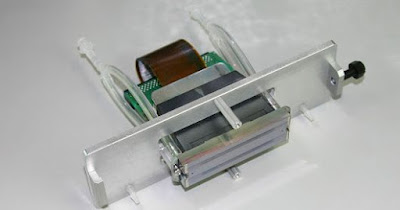
After the cover of the printer is opened, open the cover of the print head to be replaced, and prepare to remove the printing head. It is forbidden to shake or force the print head out when pulling out the print head. It should be pulled out vertically with slight force.4
When replacing the printer head, align the print head's ink slot with the ink slot on the machine, and then press the print head vertically with a slight force.5
If you need to replace more than two (including two) print heads, it is recommended that you number the print heads in advance, and then choose "replace another" according to the prompt on the display screen to install the next print head successively. Do not open more than two head covers at the same time, or the printer may not be able to identify the head.
Generally speaking, the print head in the middle will have a slightly higher amount of ink jet than the print head on both sides. The removed print head can be used in the middle with a lower amount of ink jet next time.
If the printer display indicates that a numbered print head is not replaced successfully, repeat the above steps according to the prompt and check the print head after the print head is reinserted. If the replacement fails after repeated plugging and unplugging, it indicates that there is something wrong with the print head, and a new print head needs to be replaced until the printer prompts that the replacement is successful.
6
After installing the new print head, click the "finish and check" button, and according to the prompt on the display screen, cover the cover over the machine, and the machine will automatically prepare the printing system.7
As for the replaced print head, the purple part should be placed face down, and the print head spray hole should be covered with plastic film, cover the cover again, and put into the original package for preservation.
Contact us:
Tel: 86-025-86628894
Whatsapp: +86 18851084450
E-mail: janezhang940213@gmail.com
Website: www.skyimagepaper.com
Company Name: Fei Yue Digital Technology Co.,LTD
Address: Central Road 323, Nanjing, Jiangsu, China

评论
发表评论